Add User
Add User Overview
The "Add User" feature in the Smartflo allows you to create new user accounts and configure their settings. This feature ensures that new users are set up with the necessary details, permissions, and login credentials.

Getting Started with Add User
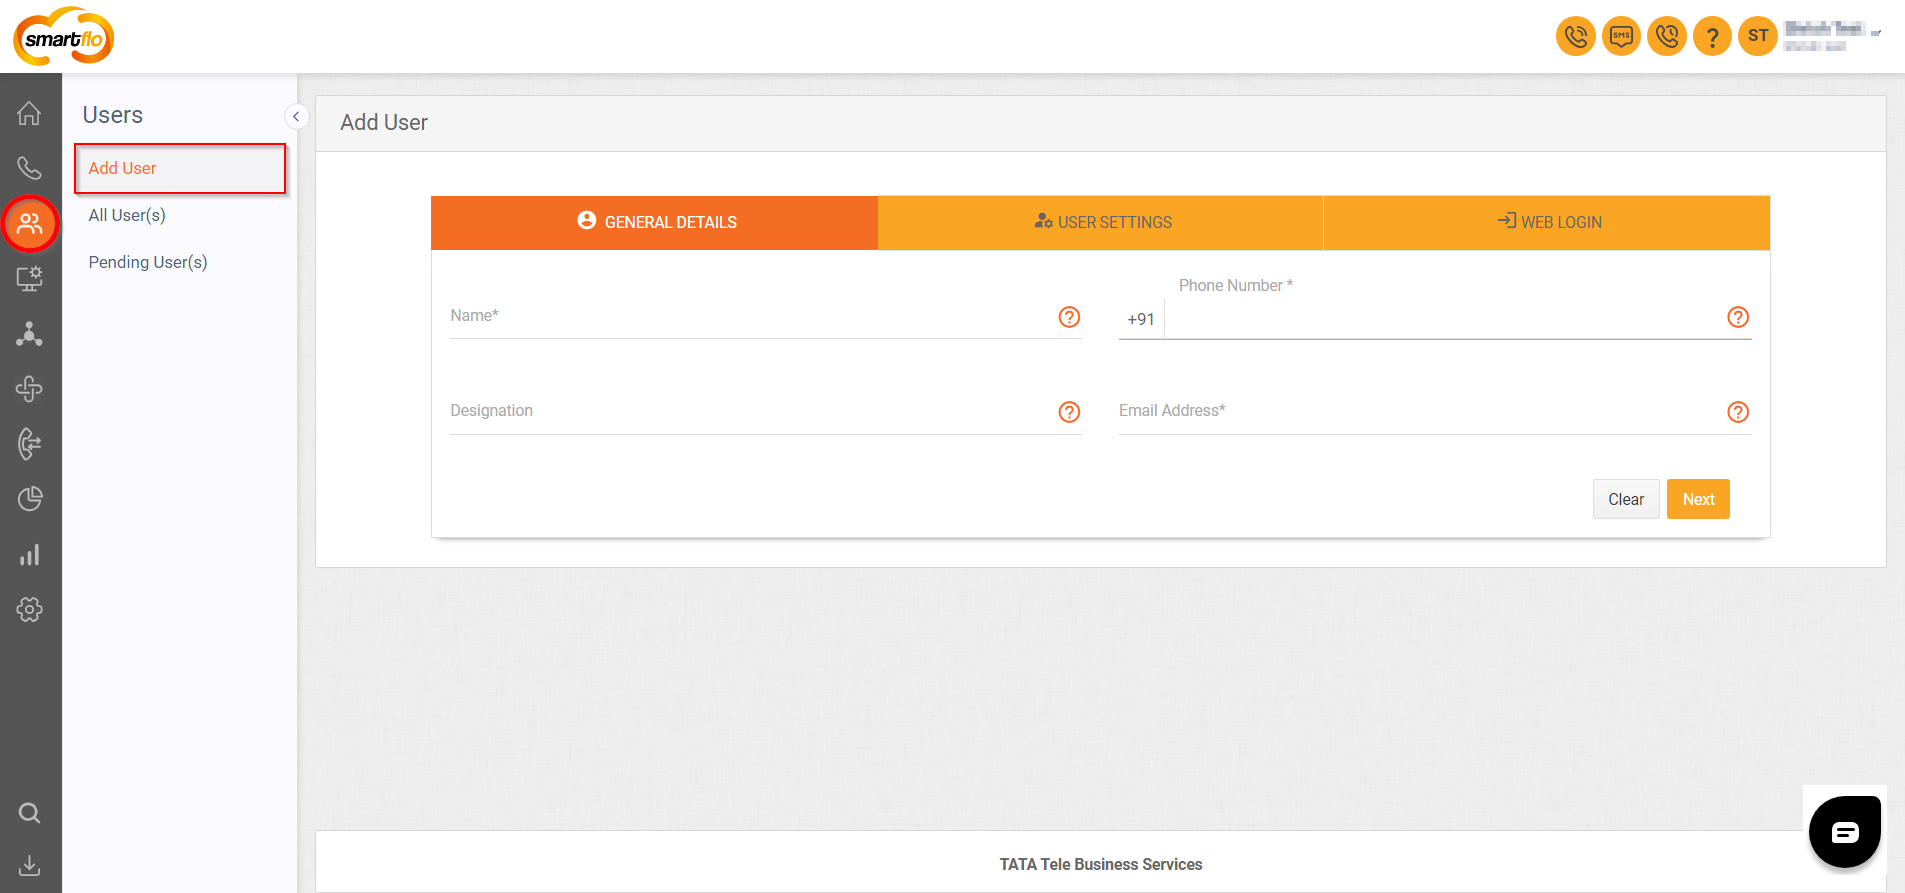
To add users to your Smartflo account, first log in using your unique User ID and Password. Once logged in, you will be directed to the main dashboard. From there, locate the navigation menu on the left-hand side of the screen and click on "Users." A set of options opens up. One of these options is the "Add User", which allows you to add new users to the system.
1. Adding General Details

- Open Add User Form
- Click on "Add User" in the Users section to open the Add User form.
- Enter User Details
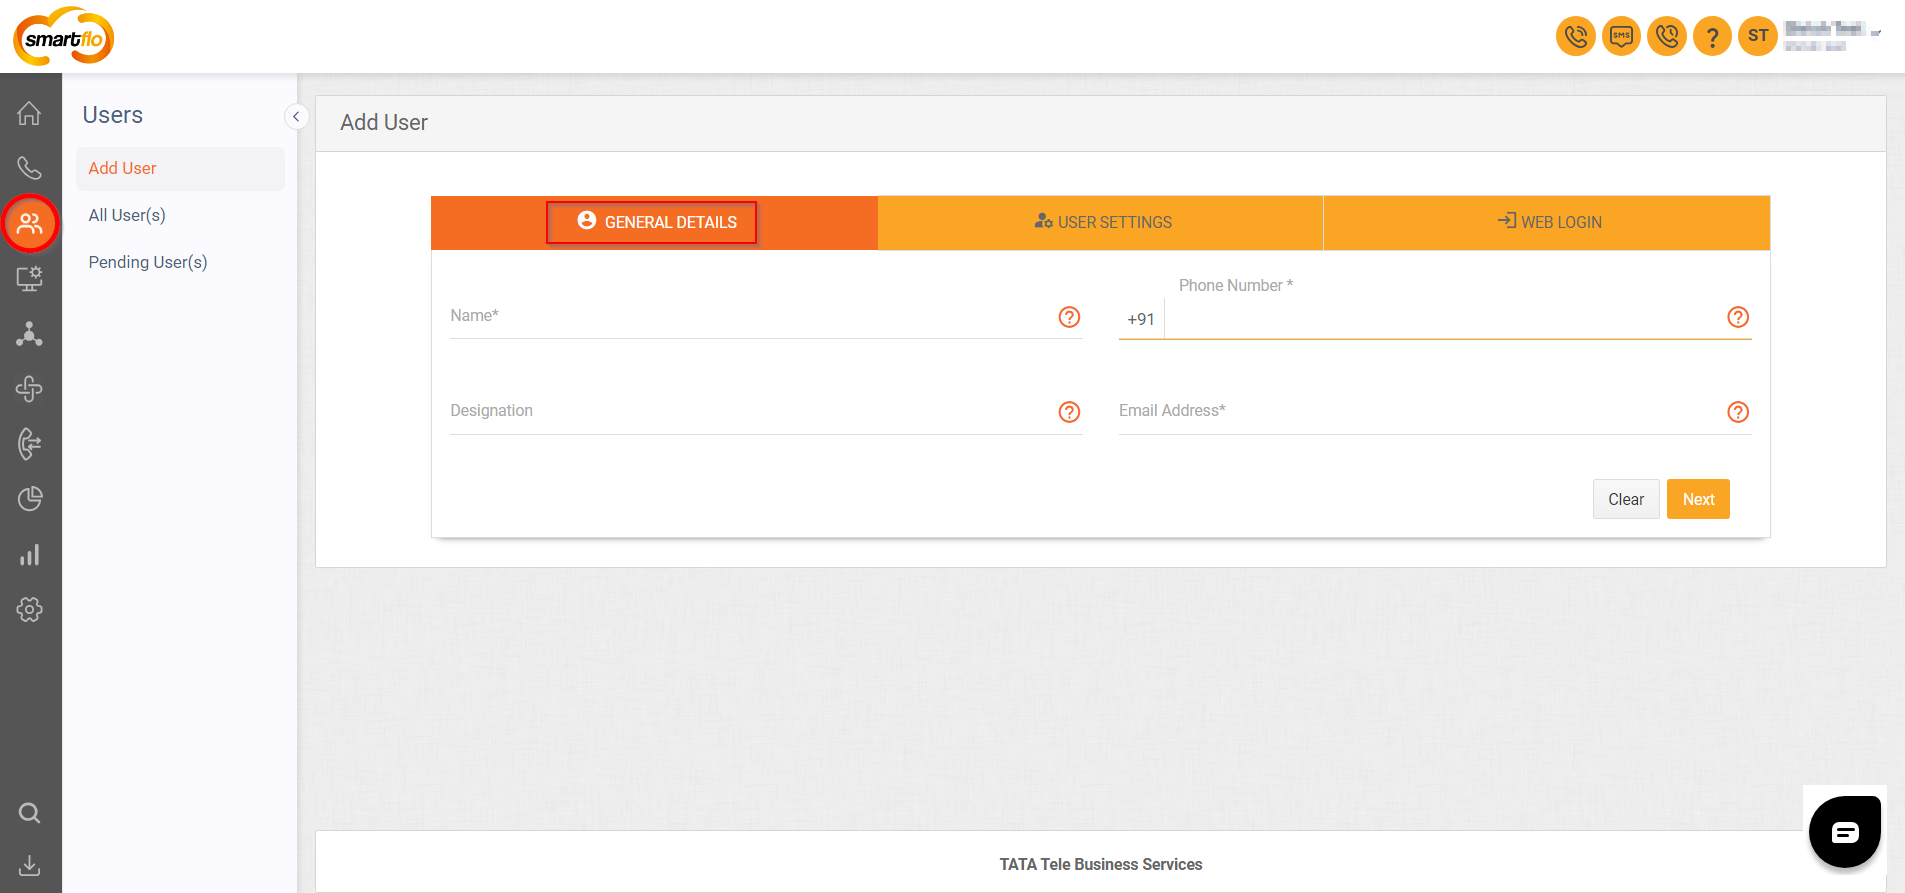
- Name: Type the full name of the user in the "Name" field.
- Designation: Enter the user's designation in the "Designation" field.
- Phone Number: Enter the user's phone number (must be 10 characters) in the "Phone Number" field.
Note:
If international calling is enabled, you must enter the 10-digit number along with the prefix.
- Email Address: Enter the user's email address in the "Email Address" field.
- Proceed to Next Section
- Click the "Next" button to move to the User Settings section.
2. Configuring User Settings

- Assign to Agent Group
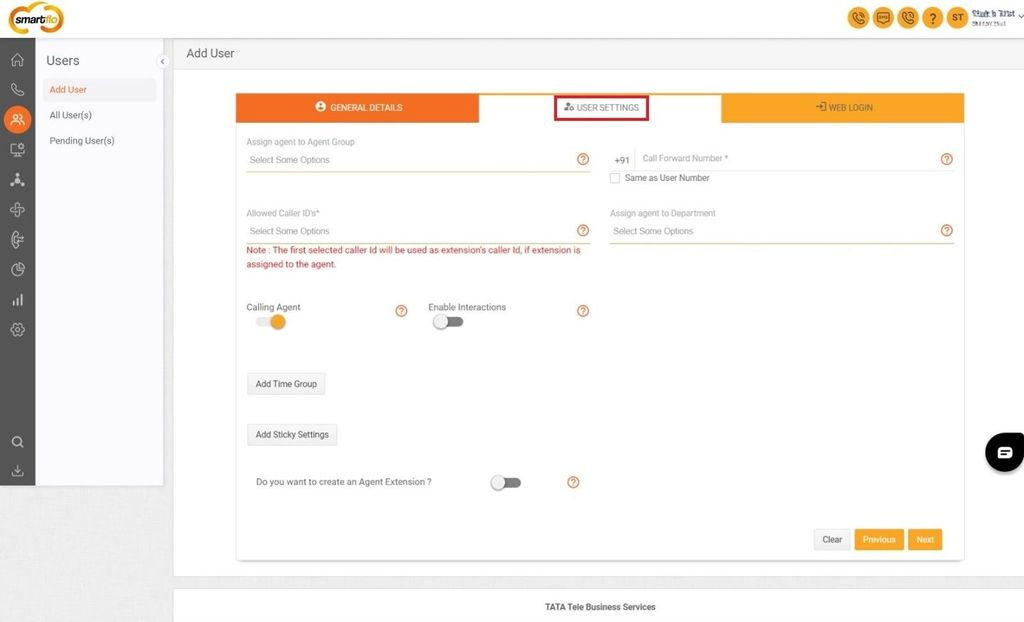
- Select an agent group from the "Assign Agent to Agent Group" dropdown menu.
- Select Allowed Caller IDs
- Choose the caller IDs the user can use from the "Allowed Caller IDs" dropdown menu.
Note:
The first selected caller ID will be used as the extension's caller ID if the extension is assigned to the agent.
- Configure Other Settings
- Toggle "Calling Agent" to enable or disable the user as a calling agent.
- Click "Add Time Group" to add a time group for the user.
The User Add Time Group option works only when an agent is set as the destination directly under My Number
- If the agent is within the time group, the call will ring the agent.
- If the agent is not part of the time group, the call will route to the defined failover destination.
> Use Case:
If an agent is assigned directly in the IVR options (e.g., Option 1 - Agent A) and a time group is applied, the following behaviour occurs:
- If the agent does not lie within the time group, the call will not route to the failover destination of the agent’s time group. Instead:
- In the case of IVR, the call will hang up.
- In the case of a department, if the agent is unavailable within the time group, the call will route to the department’s failover destination, not the agent's time group failover destination.
Note: The failover destination of an agent's time group only works when the agent is directly set as the destination under any number in My Numbers.
- Click "Add Sticky Settings" to add sticky settings for the user.
> The Sticky Agent feature in user settings applies to the agent's primary and alternate numbers. When enabled, you can choose one of the following ring strategies:
- Order By: Calls will be routed based on the sequence of the agent's primary and alternate numbers.
- Simultaneously: Calls will ring on both the primary and alternate numbers at the same time.
Additionally, you can specify the agent's ring timeout in the Timeout setting. For example, if 30 seconds is entered, the call will ring on the agent’s number for 30 seconds before proceeding to the next action.
- Toggle "Create Agent Extension" to create an agent extension for the user.
> Once the Create Agent extension is enabled, you will see three options:
AC-CID List:This functionality lets you define area codes and assign specific caller IDs to them. When an agent dials a number, the system checks the area code and routes the call using the corresponding caller ID.
For example:
- If the area code 91 is assigned to 8069651170, calls to numbers starting with 91 will use 8069651170 as the caller ID.
- If the area code 22 is assigned to 8069651180, calls to numbers starting with 22 will use 8069651180 as the caller ID.
2.Route Agent Through:
- Both: The agent can choose either the extension or the mobile number when making a click-to-call from their agent panel.
- Extension: Calls will be routed through the agent's extension only.
- Mobile Number: Calls will be routed through the agent's mobile number only.
3.Select IP Name: The functionality allows you to add an IP address and assign it to an extension. Once assigned, the agent will only be able to make calls if they are logged in from the specified IP address.
- Toggle “Block Outbound Call” option provides two settings:
- All: The agent will not be able to initiate outbound calls from the click-to-call feature.
- Only Extension: The agent will not be able to dial numbers directly from the Smartflo softphone (extension).
Important Detail
- If Only Extension is selected, the agent can still use the click-to-call feature from the Smartflo portal, but if the agent tries to dial directly from the Smartflo softphone, the call will not initiate.
- Enter the Call forward number in the "Call Forward Number" field.
- Check "Same as User Number" if the call forward number is the same as the user number.
- Select a department from the Assign Agent to Department dropdown menu. This allows the admin to assign the agent to a specific department.
- Toggle Enable Interactions to allow or restrict user interactions. When enabled, the agent can utilize three types of interactions:
- Video Calling: Agents can share a link with the customer to join a video call.
- WhatsApp: Agents can send pre-defined templates to customers during live calls for real-time interaction.
- SMS: Agents can send pre-configured SMS templates (added in the admin panel) to customers.
- Toggle Calling Agent option enables calling for the user while keeping it disabled for supervisors and admins if they are not authorized to make calls.
- Proceed to the Next Section
- Click the "Next" button to move to the Web Login section.
3. Configuring Web Login

- Select User Role
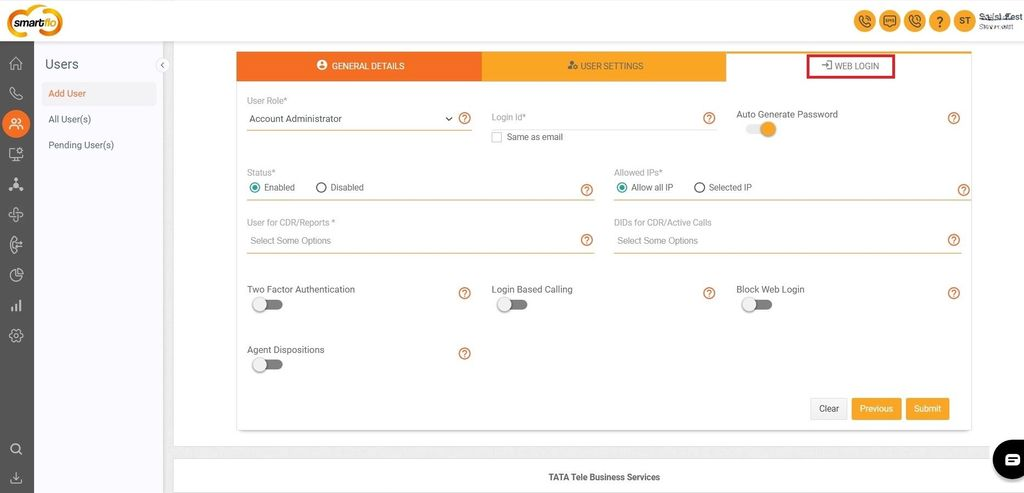
- Choose the user's role from the "User Role" dropdown menu (e.g., Account Administrator).
- Enter Login ID
- Type the user's login ID in the "Login ID" field.
- Check "Same as Email" to set the login ID the same as the email address.
- Set Account Status and IP Restrictions
- Toggle "Auto Generate Password" to auto-generate a password for the user.
- Select "Enabled" or "Disabled" to control the user's account status. Enabled allows the user to log in, while Disabled prevents the user from logging in.
- Choose "Allow All IP" or "Selected IP" for allowed IPs:
- Allow All IP: The agent can log in from any IP address.
- Selected IP: You can define specific IPs, and the agent can only log in from those designated IP addresses.
- Configure Additional Settings
- Select DIDs for CDR/Active Calls from the dropdown menu. This functionality allows you to assign a DID number associated with your account. Once assigned, the agent can view the call detail records (CDR) and live calls (active calls) associated with the selected DID.
- Select User for CDR/Reports from the dropdown menu. This allows you to assign a user who will have access to view the Call Detail Records (CDR) and reports for that specific user. You can also assign multiple users, and create an Agent Group (Agent group Link) where you can group multiple agents together, as an agent group represents a team.
> Important Detail
- When creating a new agent for the first time, the agent's name will not appear in the dropdown for User for CDR/Reports since the agent hasn't been added yet. In this case, you need to first select None. Once the agent is created, you can edit the agent details and then select the newly added agent's name for User for CDR/Reports.
- Toggle "Two-Factor Authentication" to Enable or Disable two-factor authentication. When enabled, the agent will receive an OTP on their registered mobile number every time they attempt to log in.
- Toggle "Login-Based Calling" to Enable or Disable login-based calling. When enabled, the agent can receive incoming calls only if they are logged in. If not logged in, the agent will be considered unavailable, and incoming calls will not be routed to them.
Note:
For the agent to log in to the dialer agent panel, the login-based calling feature must be enabled, as it is essential for the dialer functionality.
> Important Detail:
- If this feature is disabled, the admin will not be able to monitor the agent in the real-time agent report because the system considers the agent as always active, regardless of their actual availability.
- Toggle Agent Dispositions to enable or disable the option for agents to add call dispositions. When enabled, agents can assign a predefined disposition to a live call (incoming or outgoing) as configured in the admin portal (Agent Disposition).
- Toggle Block Web Login to restrict portal access for the user. When enabled, the agent will be unable to log in to the portal.
- Submit the Form
- Click the "Submit" button to create the user.
- Click the "Previous" button to go back to the previous section if needed.
- Click the "Clear" button to clear the form fields if needed.
Updated 2 months ago