Dialer Campaign
Add Dialer Campaign
- To add a dialer campaign, follow the below steps:
- Click on the Services tab on the side navigation.
- Click Outbound Services and select Manage Campaigns.
- A list of all the campaigns appears along with the relevant details.
- Click on Add Dialer Campaign.
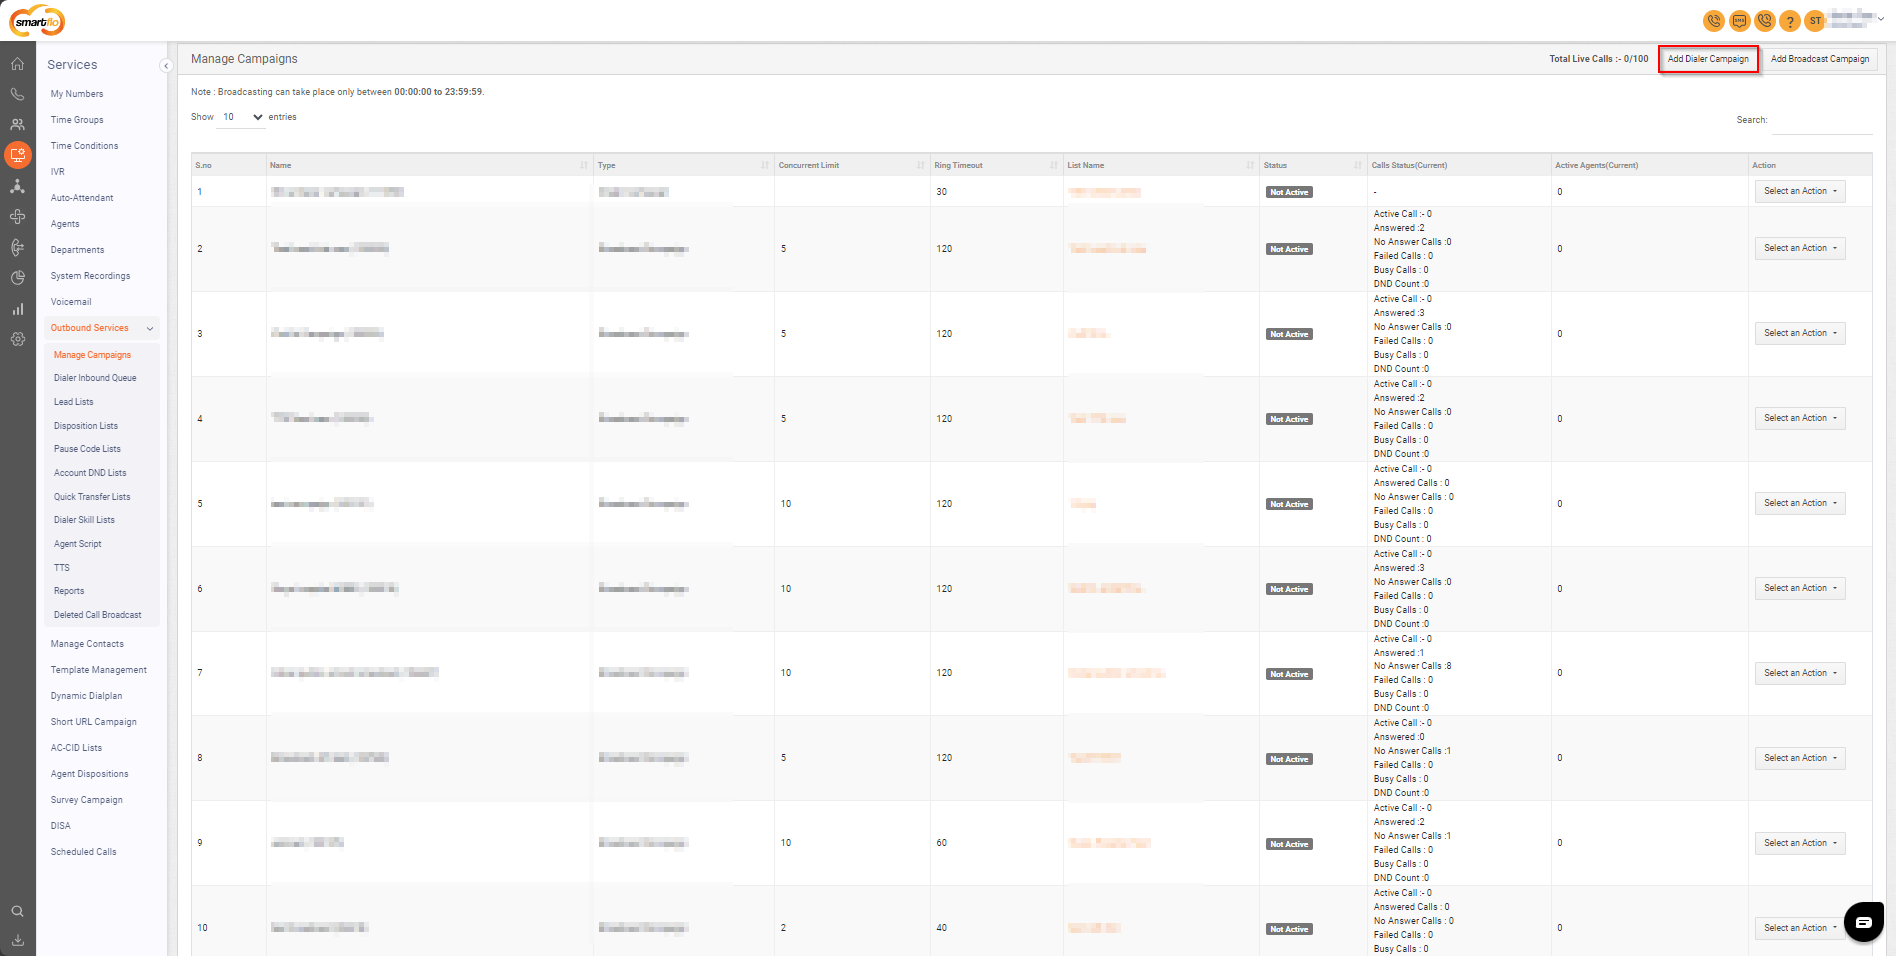
- The following screen will appear, prompting you to complete the necessary fields as shown in the screenshot below.
1. Basic Settings
- Preview, Ratio, Predictive, Power and Progressive dialer campaign settings
- The following fields appear after selecting Preview as the Dial method.
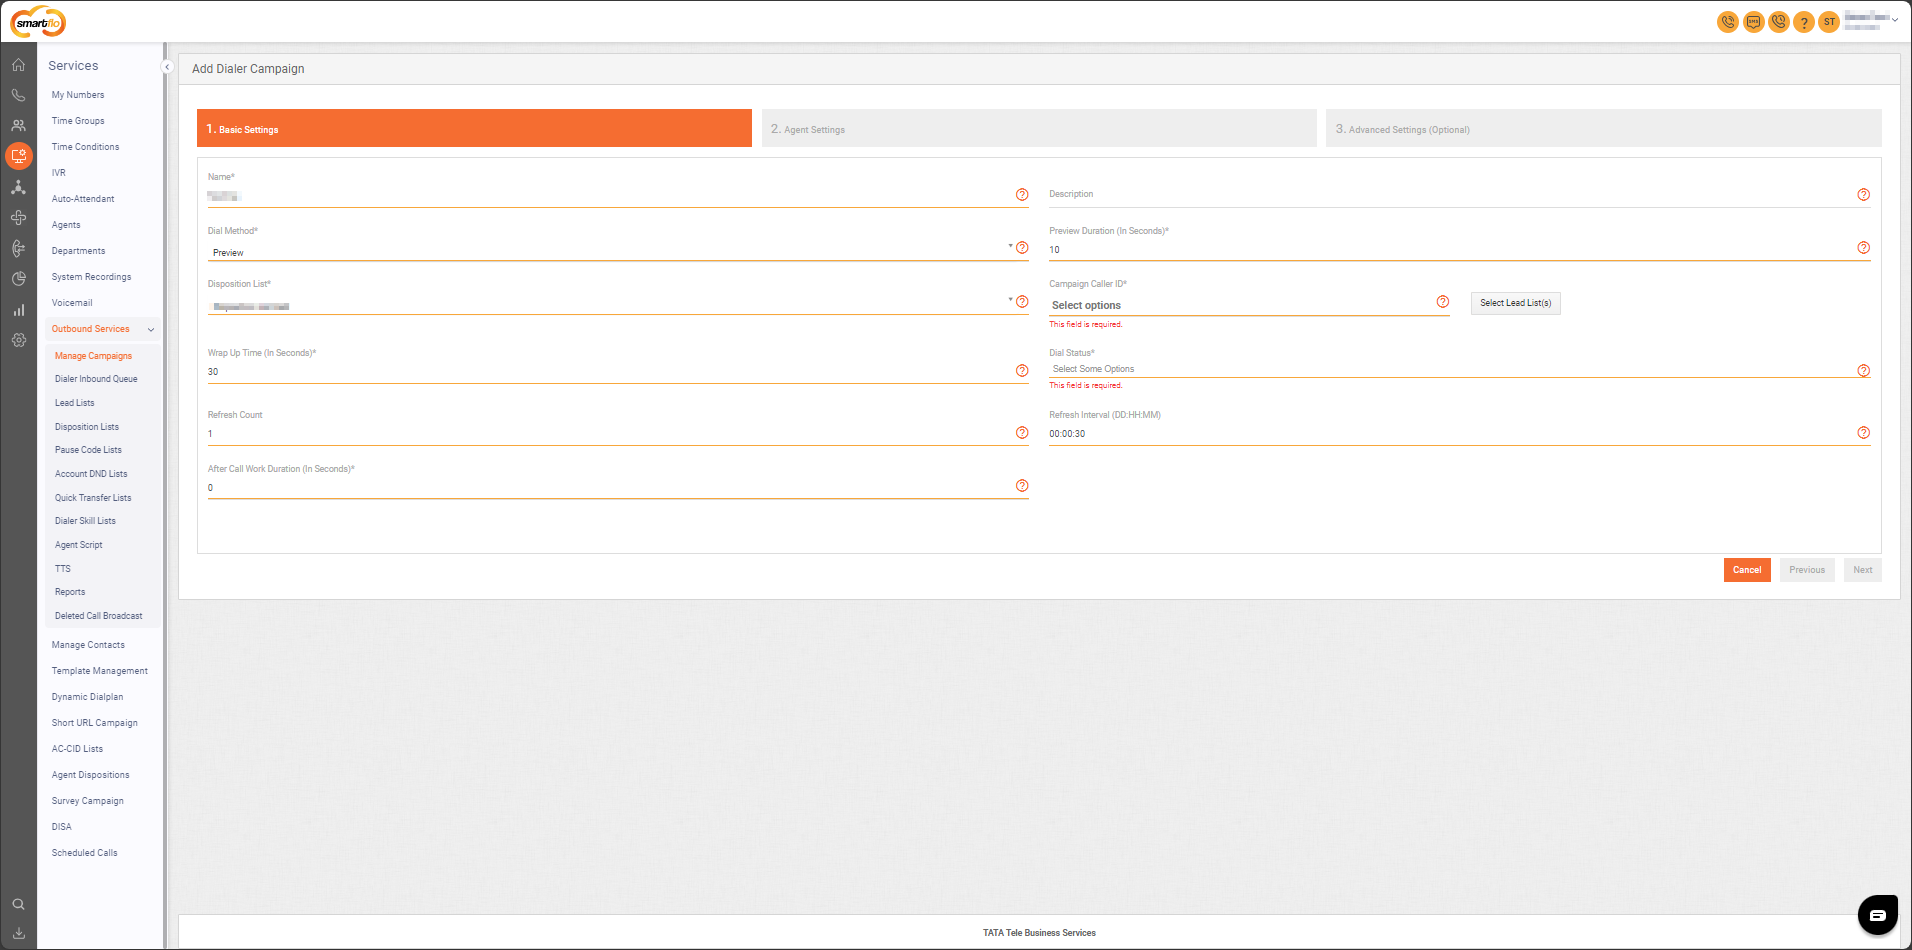
- Fill the following details in Basic Settings when preview is selected as dial method.
Field | Description | Options/Examples |
|---|---|---|
Name | The name of the campaign. | "Winter Sale Campaign" |
Description | A brief description of the campaign's purpose or details. | "Promoting Winter Sale to existing leads" |
Dial Method | The dialing method used for the campaign (e.g.Preview, Ratio, Predective and Progressive). Note: Progressive method is available on demand request (Raise an SR to enable). | "Preview" |
Preview Duration (In seconds) | Time allowed for an agent to review lead details before dialing. | 15 seconds |
Disposition List | List of call outcomes agents can select after a call. | "Answered, Not Interested, CallBack" |
Campaign Caller ID | Select the caller ID, this will be the outbound caller ID that will be visible to the customers.
| +917906900000 +918069000000 |
Select Lead List(s) | The list of leads to be targeted in the campaign. | "Winter Sale Leads" |
Wrap Up Time (In seconds) | Enter the time (in seconds) for agents to select the disposition of a call after it ends. To omit the disposition of a call, reduce the wrap-up time to 0 seconds. | 30 seconds |
Dial Status | Choose the lead status from the lead list for the leads that will be contacted through the Dialer Campaign. | "Active Leads","New","Hot lead" Etc... |
Refresh Count | Enter the number of retries for missed calls or any unforeseen circumstances on the customer’s end, such as a busy line or other issues. If the customer misses a call, the system will attempt to redial based on the refresh count.
| 3 attempts |
Refresh Interval (DD: HH: MM) | Enter the number of minutes, hours, or days (in the format DD: HH: MM) after which the dialer will attempt to retry calling the customer.
| 00:30:00 (30 minutes) |
After Call Work Duration | It refers to the time interval given to the agent between two consecutive calls, which is allotted after the call has been disposed of. | 20 seconds |
- The following fields appear after selecting Ratio as the Dial method.
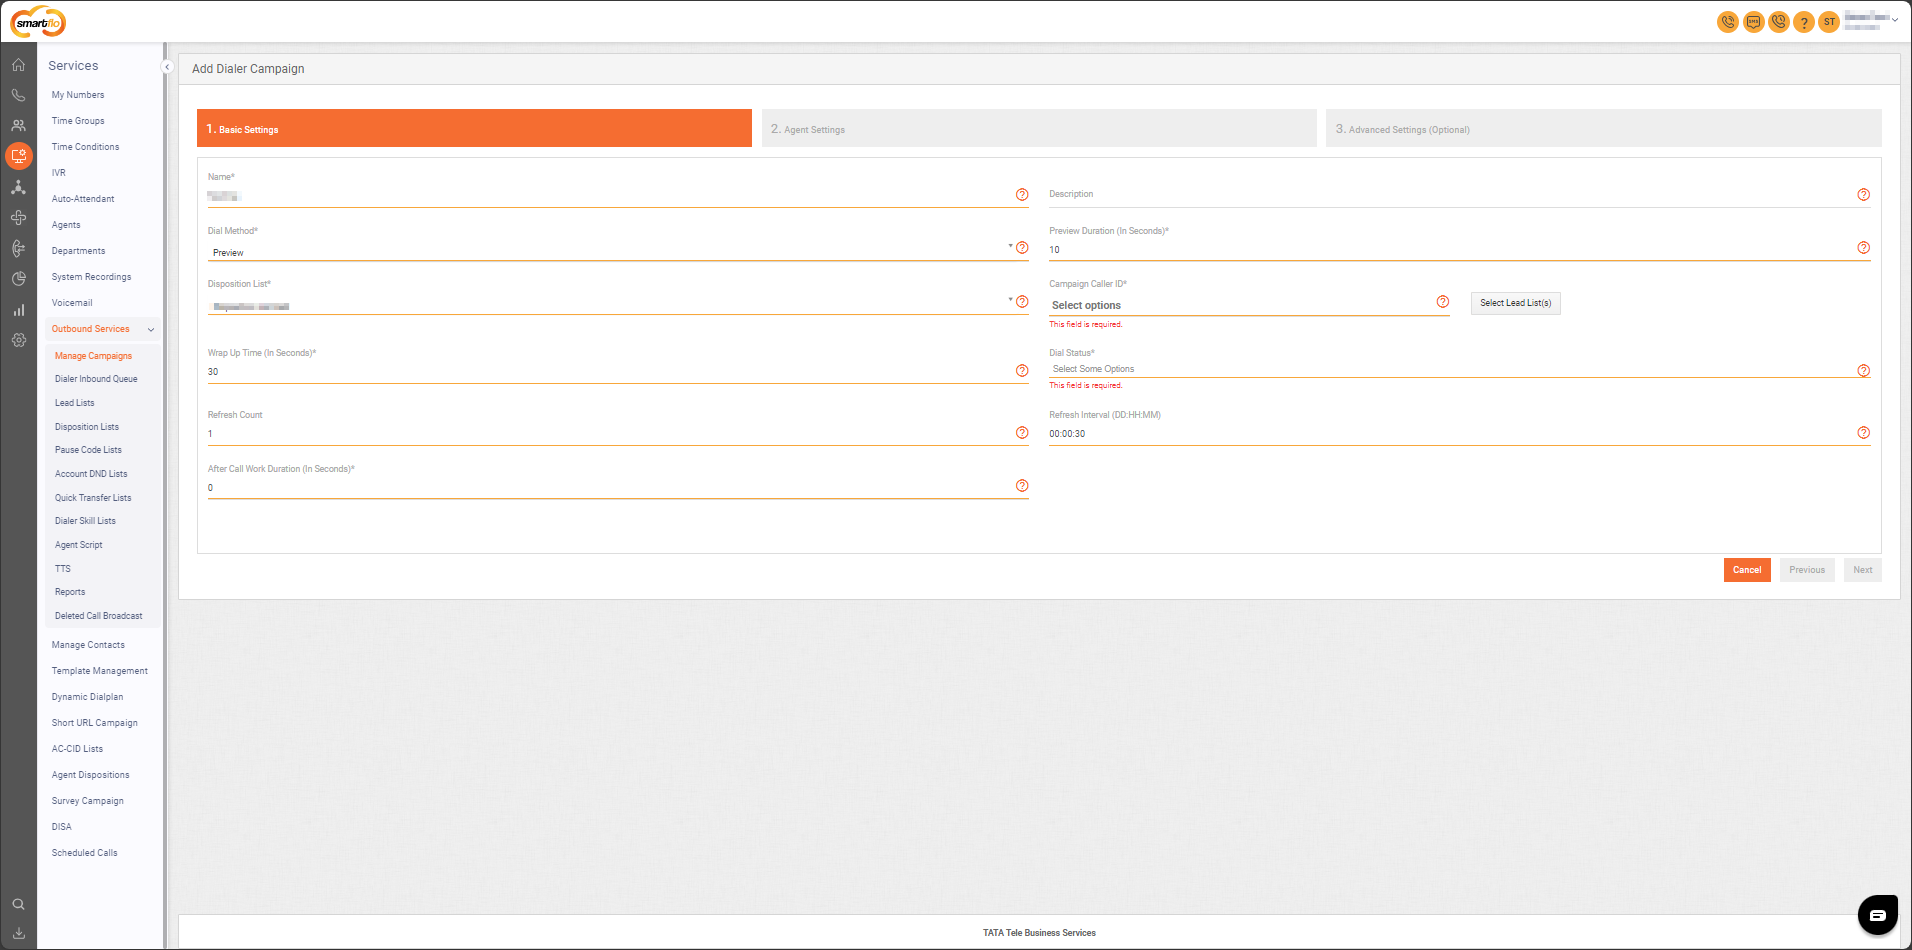
- Fill the following details in Basic Settings when Ratio is selected as dial method.
Field | Description | Options/Examples |
|---|---|---|
Name | The name of the campaign. | "Sale Campaign Ratio"`` |
Description | A brief description of the campaign's purpose or details. | "Sale Campaign for high-value customers" |
Dial Method | The dialing method (in this case, Ratio). | "Ratio" |
Dial Ratio | Number of calls dialed per agent. | "1:5" (5 calls dialed for each agent) |
Disposition List | Select the disposition list that represents the possible call outcomes for the agent. This allows the agent to choose the appropriate disposition after the call is completed. | "Answered, Not Available, CallBack" |
Campaign Caller ID | Select the caller ID, this will be the outbound caller ID that will be visible to the customers.
| +917906900000 +918069000000 |
Select Lead List(s) | The list of leads to be targeted in the campaign. | "High-Value Customers" |
Wrap Up Time (In seconds) | Enter the time (in seconds) for agents to select the disposition of a call after it ends. To omit the disposition of a call, reduce the wrap-up time to 0 seconds. | 20 seconds |
Dial Status | Choose the lead status from the lead list for the leads that will be contacted through the Dialer Campaign. | "Active Leads","New","Hot lead" Etc... |
Queue Timeout (In Seconds) | The maximum time a caller can remain in the queue before the system takes alternative action (e.g., redirect or end the call). | 60 seconds |
Ring Strategy | Select the strategy such as Random, fewest calls, and longest waiting time strategies, that will be used to distribute calls that are on hold to the agent | "Fewest Calls" |
Retry Count | Enter the number of retries for missed calls or any unforeseen circumstances on the customer’s end, such as a busy line or other issues. If the customer misses a call, the system will attempt to redial based on the retry count. | 2 attempts |
Retry Interval (DD:HH:MM) | Enter the number of minutes, hours, or days (in the format DD: HH: MM) after which the dialer will attempt to retry calling the customer. | 0:30:00 (30 Minutes) |
After Call Work Duration | It refers to the time interval given to the agent between two consecutive calls, which is allotted after the call has been disposed of. | 20 seconds |
- Click on Next.
Power Dialer Overview:
The power dialer functions similarly to a ratio dialer, allowing users to set a dialing "power" that determines how many calls the system initiates relative to the number of active agent sessions, regardless of agent availability.
For example, if there are 10 agents currently logged in and the dialing power is set to 3, the system will place 30 calls initially. As calls connect and are patched to 3 agents, the remaining 27 calls will remain in the ringing state.
Important Note: Inbound calls are prioritized. If there are any calls waiting in the inbound queue, these inbound calls must be connected to available agents before any outbound power dialer calls are patched. This ensures efficient utilization of agent resources while maintaining high service levels for inbound callers.
Dial Status and Call Rechurn:
Dial status is utilized to manage call rechurning based on call dispositions. Customers can configure the number of retry attempts and the interval between retries, enabling leads to be automatically re-engaged according to predefined rules. This functionality helps optimize lead follow-up by systematically retrying contacts based on their disposition outcomes, improving conversion rates and contact efficiency.
2. Agent Settings
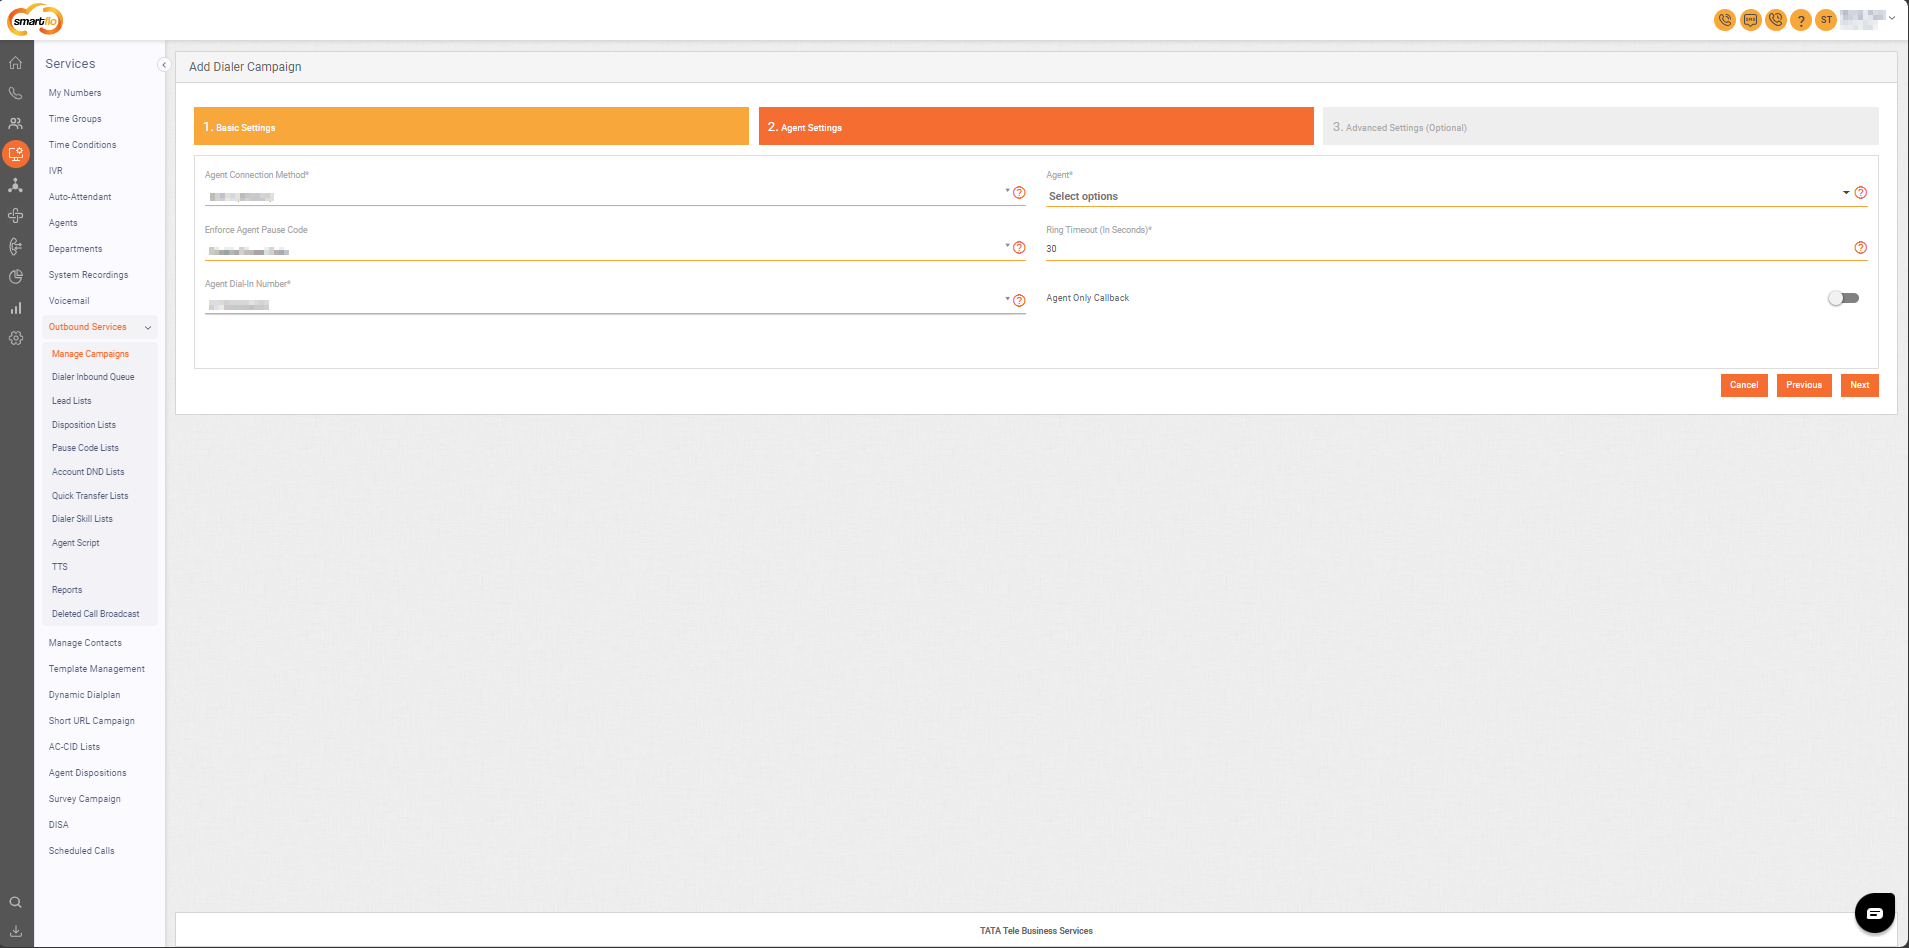
- Fill the following details in Agent Settings.
Field | Description | Options/Example |
|---|---|---|
Agent Connection Method | Method for agents to log into the dialer panel. | The below options vary as per the Dial Method. For Preview, the below 3 options appear, whereas, in Ratio, Dial Out(Each Call) option does not populate.
Note: In Dial In (Session) and Dial Out (Session), a session starts when the agent logs into the agent Dialer Panel and prevails up until the logout session. Whereas in Dial Out (Each Call) a session is established for each call that the agent makes to the customers and the session ends when the call disconnects.** |
Agent | The specific agent assigned to the campaign. | "Agent John Doe" |
Enforce Agent Pause Code | Requires agents to enter a pause code when taking a break or pausing their status. (disable, enable, enforce pause code) |
|
Pause Code List | The list of available pause codes agents can select when pausing their status. | "Lunch, Break, Meeting" |
Ring Timeout (In seconds) | The duration of time (in seconds) the call will ring on the customer. number | 30 seconds |
Agent Dial-In Number | The Agent Dial-In Number is the phone number that agents will dial to log in or access the dialer campaign. | 918069650000 |
Agent Only callback | A toggle option to enable or disable the ability to schedule a callback to the same agent who is scheduling the call. If disabled, the agent can assign the callback to another agent within the campaign. | "Enable" or "Disable |
- Click on Next.
- Advanced Settings
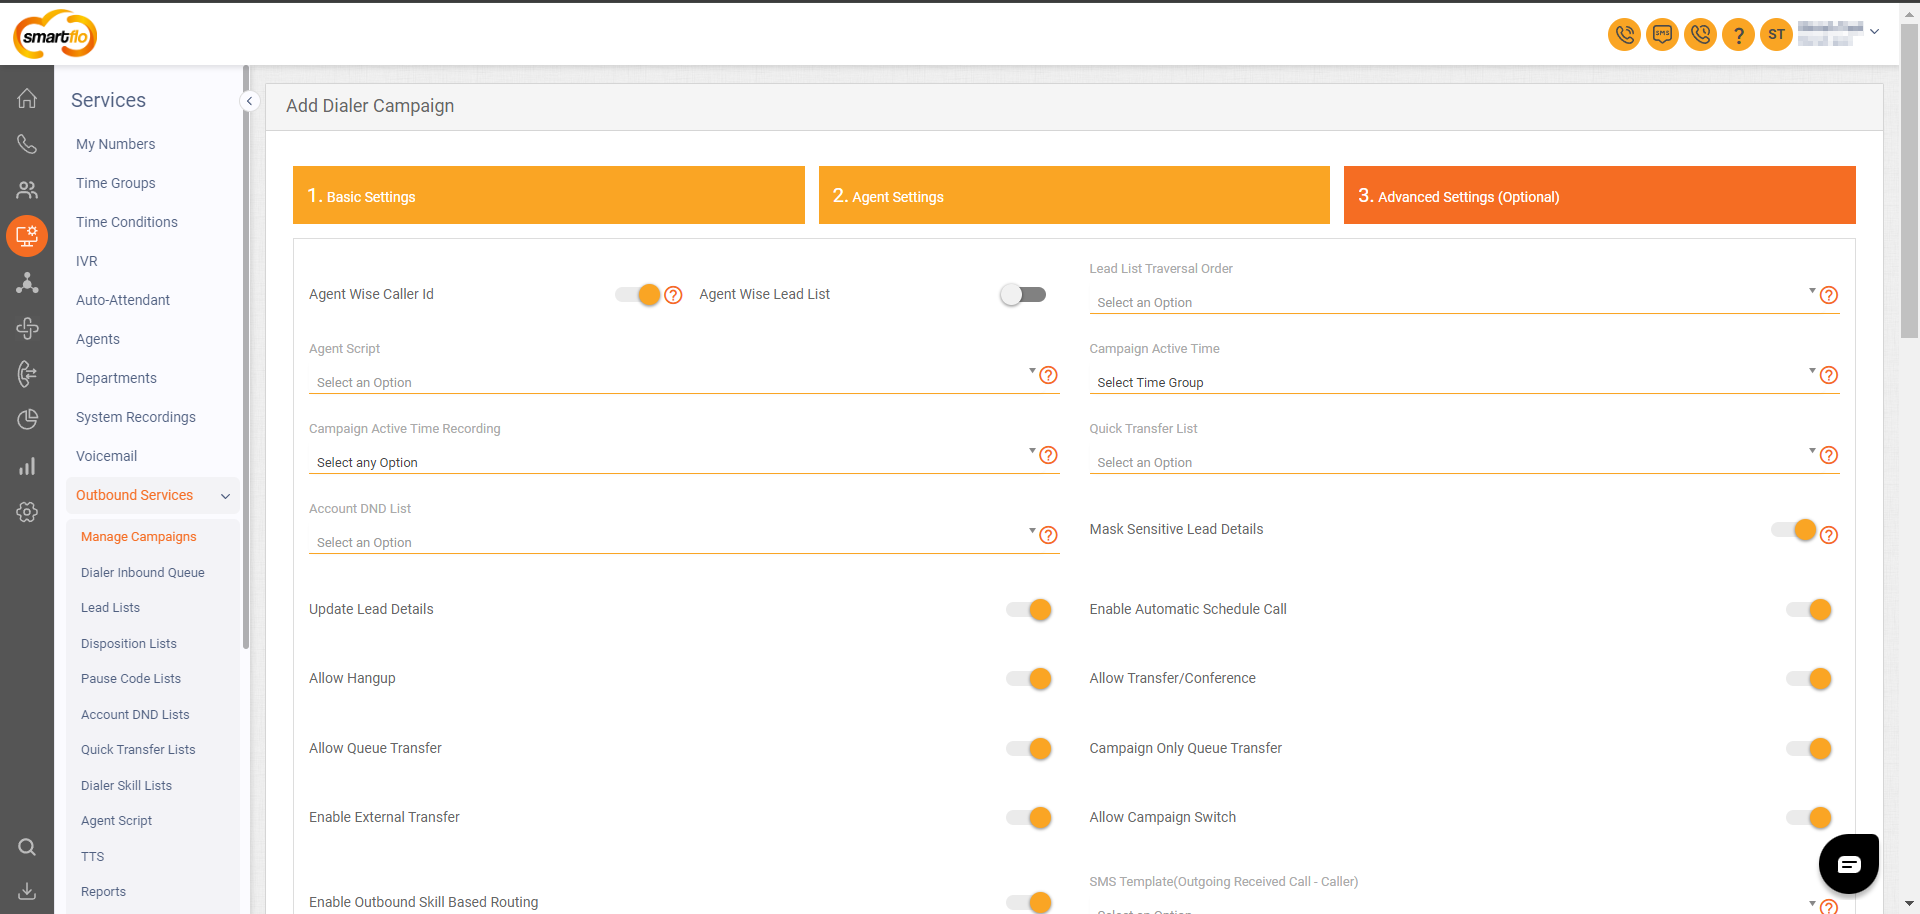
- Fill the following details in Agent Settings.
Field | Description | Options/Example |
|---|---|---|
Agent Wise Caller ID | Toggle to enable or disable agent-specific caller IDs for calls.
| "Disabled" |
Agent Wise Lead List | Assign specific lead lists to individual agents. | "Enable" |
Lead List Traversal Order | Select the order for traversing leads. (e.g., Oldest First, Newest First, Random). | "Oldest First" |
Agent Script | Script that agents will follow during the call. | "Sales Script - Winter Promotion" |
Campaign Active Time | Time group for when the campaign will be active. | "9:00 AM - 6:00 PM" |
Campaign Active Time Recording | Choose the active time recording settings for the campaign. | "Enable" |
Quick Transfer List | Choose a list of quick transfer options available for agents. | "Sales Support, Technical Support" |
Account DND List | Select the DND list for the campaign to avoid calling numbers on the do-not-disturb list. | "National DND List" |
Mask Sensitive Lead Details | Toggle to enable masking of sensitive information in lead details. | "Enable" |
Update Lead Details | Toggle to allow agents to update lead details during the call. | "Enable" |
Enable Automatic Schedule Call | A toggle option to enable or disable automatic dialing of the call at the specified time. If enabled, the system will automatically dial the call at the scheduled time without manual intervention. | "Enable" |
Allow Hangup | Toggle to enable or disable the agent’s ability to hang up a call. | "Enable" |
Allow Transfer/Conference | Toggle to enable the agent to transfer calls or initiate a conference call. | "Enable" |
Allow Queue Transfer | Toggle to enable the option for agents to transfer calls to a inbound queue. | "Enable" |
Campaign Only Queue Transfer | A toggle option to restrict queue transfers within the campaign only, allowing transfers only to the inbound queues that have been selected in the campaign. This ensures that agents can only transfer calls to the specific queues assigned to the campaign, enhancing control and organization within the campaign. | "Enable" |
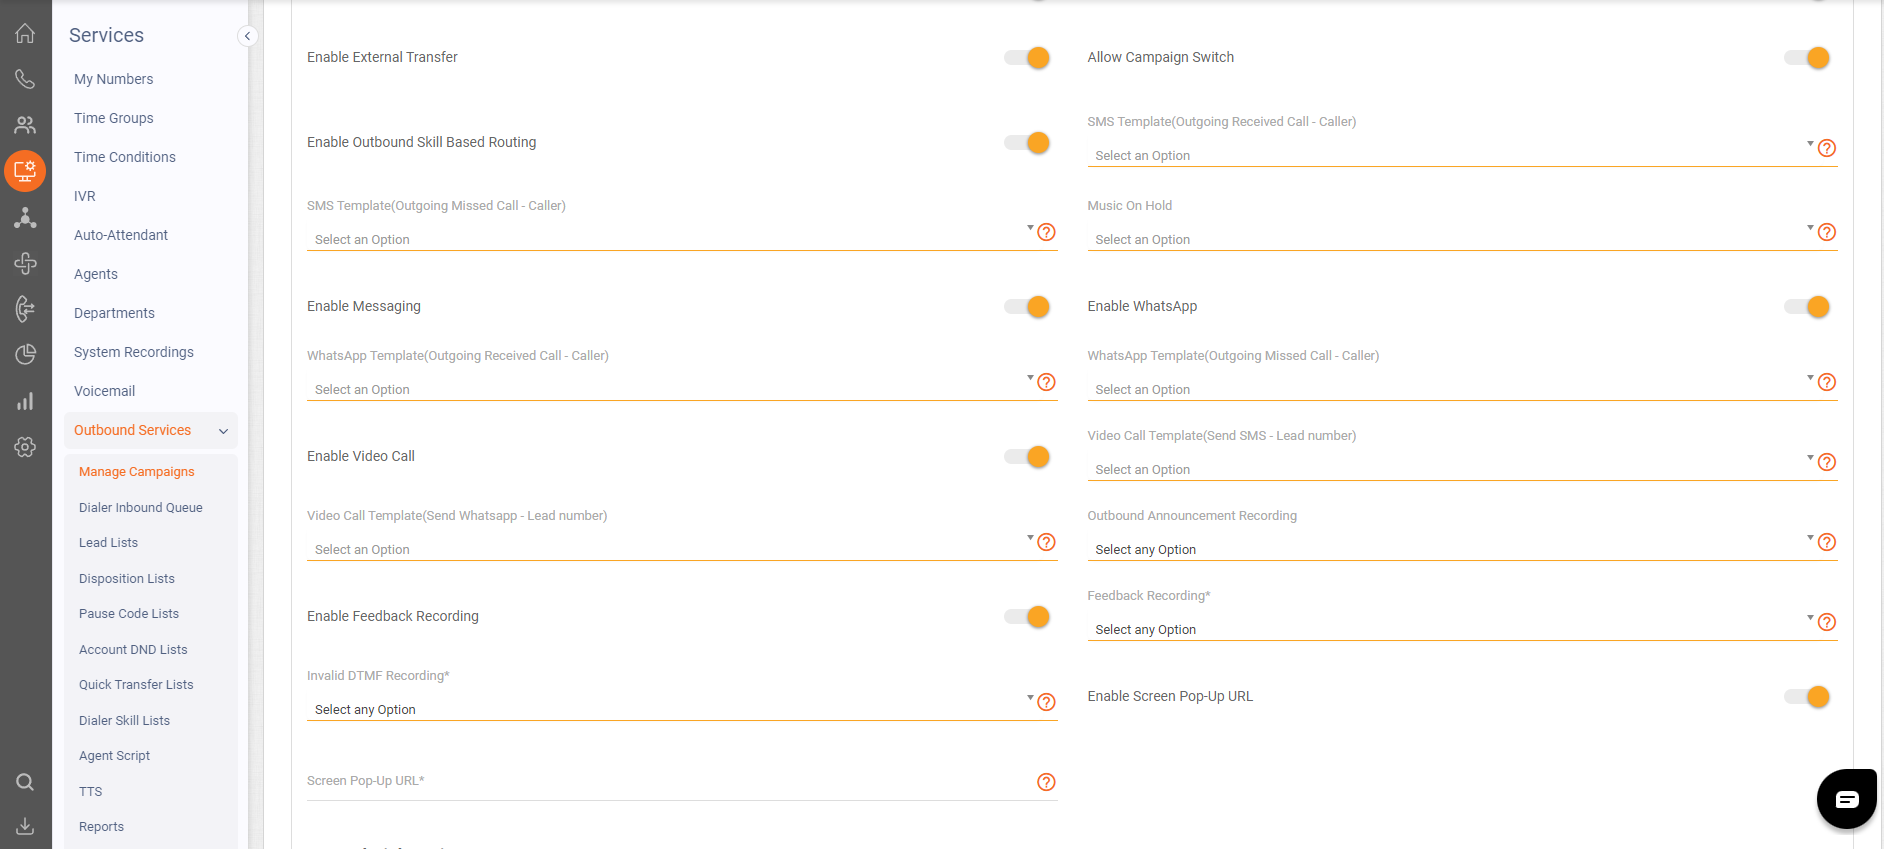
Enable External Transfer | A toggle option to allow external transfers to numbers outside of the campaign. | "Enable" |
Allow Campaign Switch | Toggle to allow agents to switch between campaigns during operation. | "Enable" |
Enable Outbound Skill-Based Routing | Toggle to enable routing calls based on agent skills.
| "Enable" |
SMS Template (Outgoing Received Call - Caller) | Select an SMS template to be sent to the caller after receiving their call. Note: The SMS template must be configured with the DIALER -(OUTGOING RECEIVED CALL (TO CALLER)) trigger in Template Management. | "Thank you for calling - Template A" |
SMS Template (Outgoing Missed Call - Caller) | Select an SMS template to be sent to the caller if the call is missed. Note: The SMS template must be configured with the DIALER -(OUTGOING MISSED CALL (TO CALLER)) trigger in Template Management. | "You missed a call from us" |
Music On Hold | Select a recording to play while the caller is on hold | "Classical Music Track A" |
Enable Messaging | Toggle to enable outbound messaging capabilities (Interactions) for the campaign. | "Enable" |
Enable WhatsApp | Toggle to enable WhatsApp SMS triggers. | "Enable" |
WhatsApp Template (Outgoing Received Call - Caller) | Select the WhatsApp message template to send after receiving the caller's message. Note: The SMS template must be configured with the DIALER - (OUTGOING RECEIVED CALL (TO CALLER)) trigger in Template Management, with the WhatsApp toggle enabled. | "Thanks for contacting us" |
WhatsApp Template (Outgoing Missed Call - Caller) | Select the WhatsApp SMS template that will be sent to the caller when the call is missed by the customer. Note: The SMS template must be configured with the DIALER - (OUTGOING MISSED CALL (TO CALLER)) trigger in Template Management, with the WhatsApp toggle enabled. | "You missed a call from us" |
Enable Video Call | Toggle to enable video calling capability. | "Enable" |
Video Call Template (Send WhatsApp - Lead number) | Select a WhatsApp template to send to the lead number for a video call. Note: The SMS template must be configured with the DIALER -(VIDEO CALL(TO LEAD NUMBER)) trigger in Template Management, with the WhatsApp toggle enabled. | "Join our Video Call - Winter Promo" |
Video Call Template (Send SMS - Lead number) | Select an SMS template to send to the lead number for a video call. Note: The SMS template must be configured with the DIALER -(VIDEO CALL(TO LEAD NUMBER)) trigger in Template Management. | "Join our Video Call - Winter Promo" |
Outbound Announcement Recording | Choose a pre-recorded outbound announcement to be played during the campaign. | "Holiday Offer Announcement" |
Enable Feedback Recording | Toggle to enable feedback recording after a call ends. | "Enable" |
Agent Call Patch Music | Choose the recording that will be played when the call is patched to the agent. This recording could include a greeting or a pre-recorded message informing the agent about the call, or it could be a brief announcement that prepares the agent for the call. | "You are now connected to the customer" |
Feedback Recording | Select the feedback recording that will be played after the call ends for the caller to provide feedback. | "Feedback Request " |
CSAT Survey | Select the feedback CSAT (Customer Satisfaction) Survey that will be sent to the customer after the call. | Please rate your experience:
|
Enforce CSAT on Hangup | Toggle to enforce CSAT feedback collection mandatory when a call is disconnected to improve response rates. | Feedback IVR |
Screen Pop-Up URL | After enabling theScreen Pop-Up toggle, you can enter the desired URL in the Screen Pop-Up URL field. This URL will automatically open in a new tab in the browser. | companysupport.com/leadnumber/name |
Enforce Dial Status | Toggle to enforce mandatory disposition before moving to the next lead. | "Answered or Not Answered......Etc." |
Auto Dispose Unanswered calls | Automated lead status updates for unanswered calls, while retaining the current behavior for rejected calls. | Rejected |
Auto dispose schedule callback | Automatically disposes of calls marked as missed, busy, or similar outcomes in the Ratio Dialing Method, ensuring efficient call handling and reducing manual effort by agents. | "Not Answered" or "Busy" |
- Manual Dial Settings
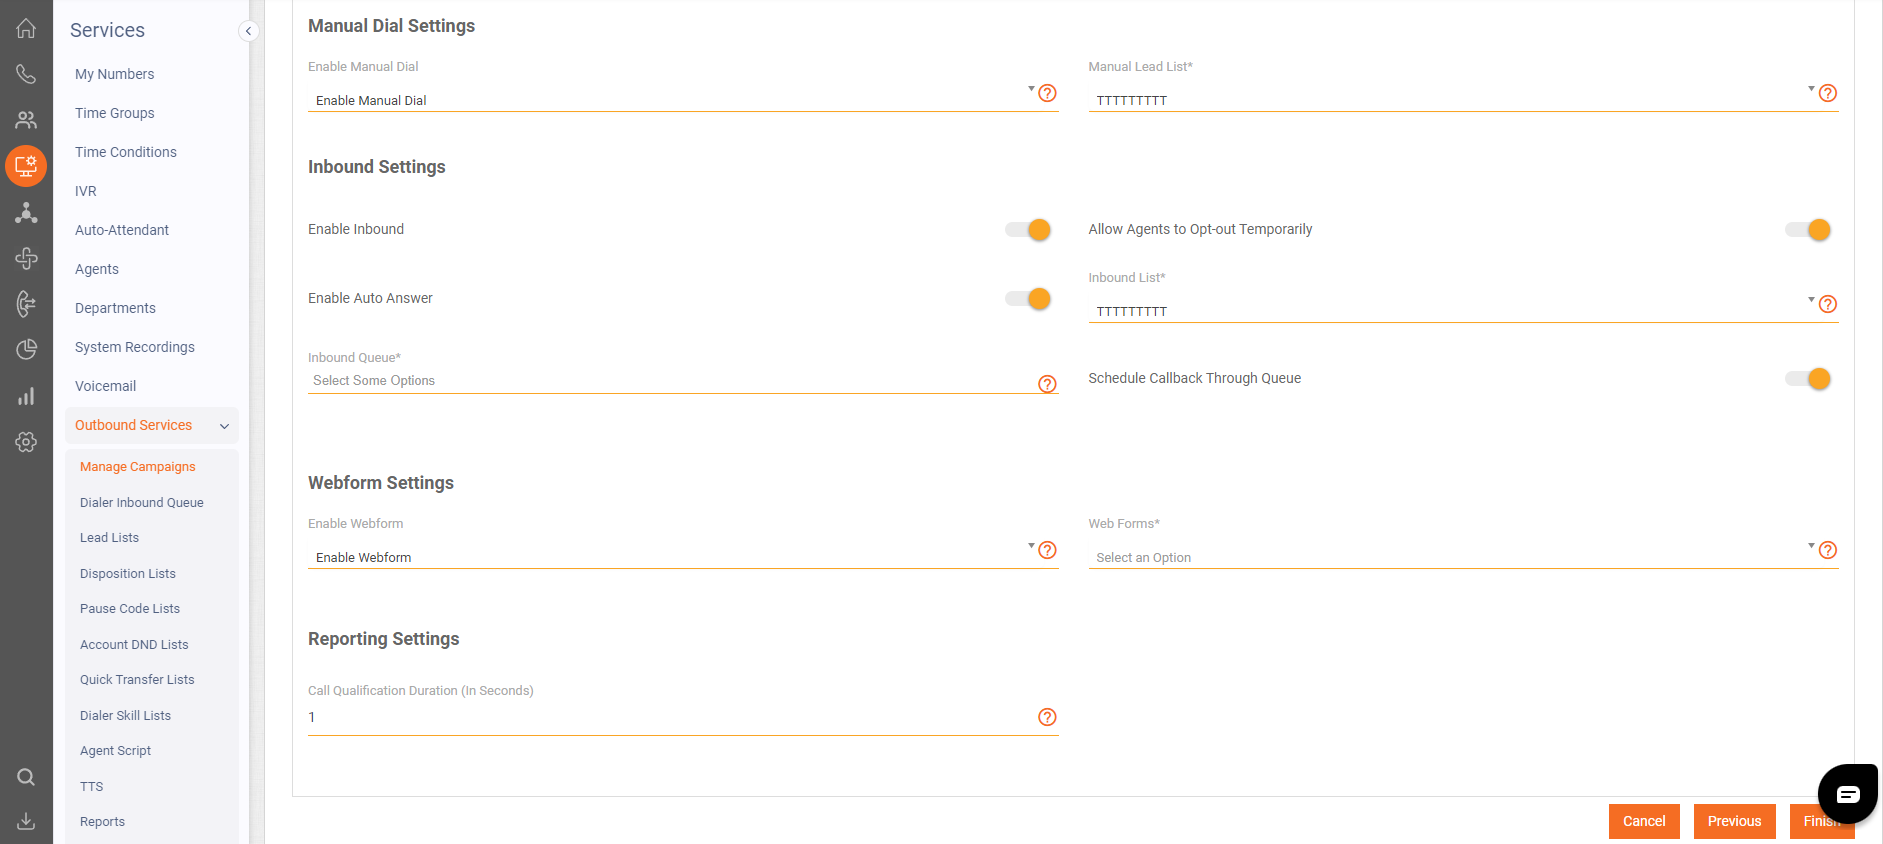
Field | Description | Options/Example |
|---|---|---|
Manual Dial Settings | Allows you to configure manual dialing options. There are three options in the dropdown:
| Enable Manual Dial, Agent Wise Manual Dial |
Manual Lead List | A dropdown to select a lead list for manual dialing. This option is available only if Manual Dial Settings is set to Enable Manual Dial or Agent Wise Manual Dial. If disabled, this field disappears. | Customer Leads List, Sales Leads List |
- Inbound Settings
| Field | Description | Options/Example |
|---|---|---|
| Enable Inbound | A toggle to enable or disable inbound settings for the campaign. | "Enabled" |
| Allow Agents to Opt-Out Temporarily | Toggle to allow agents to temporarily opt out of inbound calls. | "Enabled" |
| Enable Auto Answer | Automatically answers inbound calls for agents. | "Disabled" |
| Inbound List | Dropdown to select the inbound list for the campaign. | "Support Team List" |
| Inbound Queue | Dropdown to select the inbound queue for the campaign. | "Priority Queue 1" |
| Schedule Callback Through Queue | Toggle to allow scheduling callbacks through the inbound queue. | "Enabled" |
- Webform Settings
Field | Description | Options/Example |
|---|---|---|
Webform Settings | Allows you to configure webform usage in the campaign. There are three options in the dropdown: 1.Disable Webform: Disables webform usage. 2.Enable Webform: Enables webform usage for all agents. 3.Enforce Webform: Requires agents to fill out a webform for every call. | Disable Webform, Enable Webform, Enforce Webform |
Web Forms | A dropdown to select a web form for the campaign. This field disappears if Webform Settings is set to Disable Webform. | Contact Form, Lead Form |
- Reporting Settings
| Field | Description | Options/Example |
|---|---|---|
| Reporting Settings | Allows you to set the Call Qualification Duration (in seconds), which defines the minimum time for a call to be qualified for reporting purposes. | Example: "30 seconds", "60 seconds", "120 seconds" |
- Click on Finish.
Updated 6 months ago