API Dialplan
API Dialplan Overview
-
The API Dialplan feature allows clients to implement advanced functionalities that are not available in the standard version or user interface. It operates on a request-response model, processing user requests and providing responses to define the actions that need to be performed. This enables seamless integration of customized workflows tailored to specific business requirements.
-
We provide four custom API Dialplan solutions as explained below:
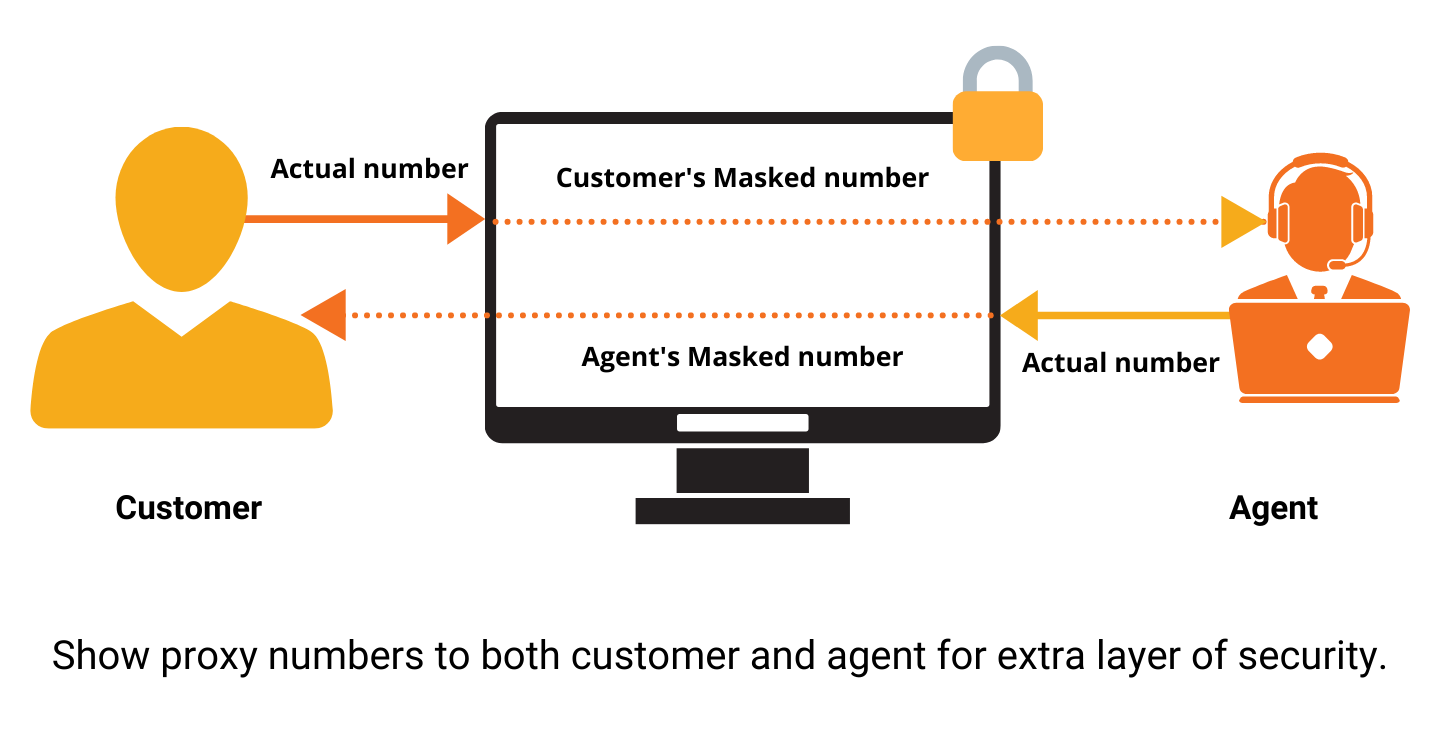
- Allow two parties to communicate with each other with enhanced security without disclosing their numbers.
- Allow registered users to connect with agents, instead of being directed to IVR, to offer accentuated customer service.

- Ensure customers connect with agents of their local region and help them hear recordings based on their geographical locations.

- Allow customers to connect with delivery agents for enhanced coordination for a smooth delivery process.
 Summary
Hence, we provide 3 key custom solutions, which are:
- Playing custom Recording as per calling user (contains information about the source of the recording)
- Transferring calls as per location (contains information about where call is to be transferred)
- Implementing nested API Dialplans (contains information about dialplans to be included)
Getting Started with API Dialplan -
-
To go to API Dialplan to your Smartflo account, first log in using your unique User ID and Password. Once logged in, you will be directed to the main dashboard. From there, locate the navigation menu on the left-hand side of the screen and click on "API Connect". A set of options opens up. One of these options is the “API Dialplan".
- List of all API Dialplan
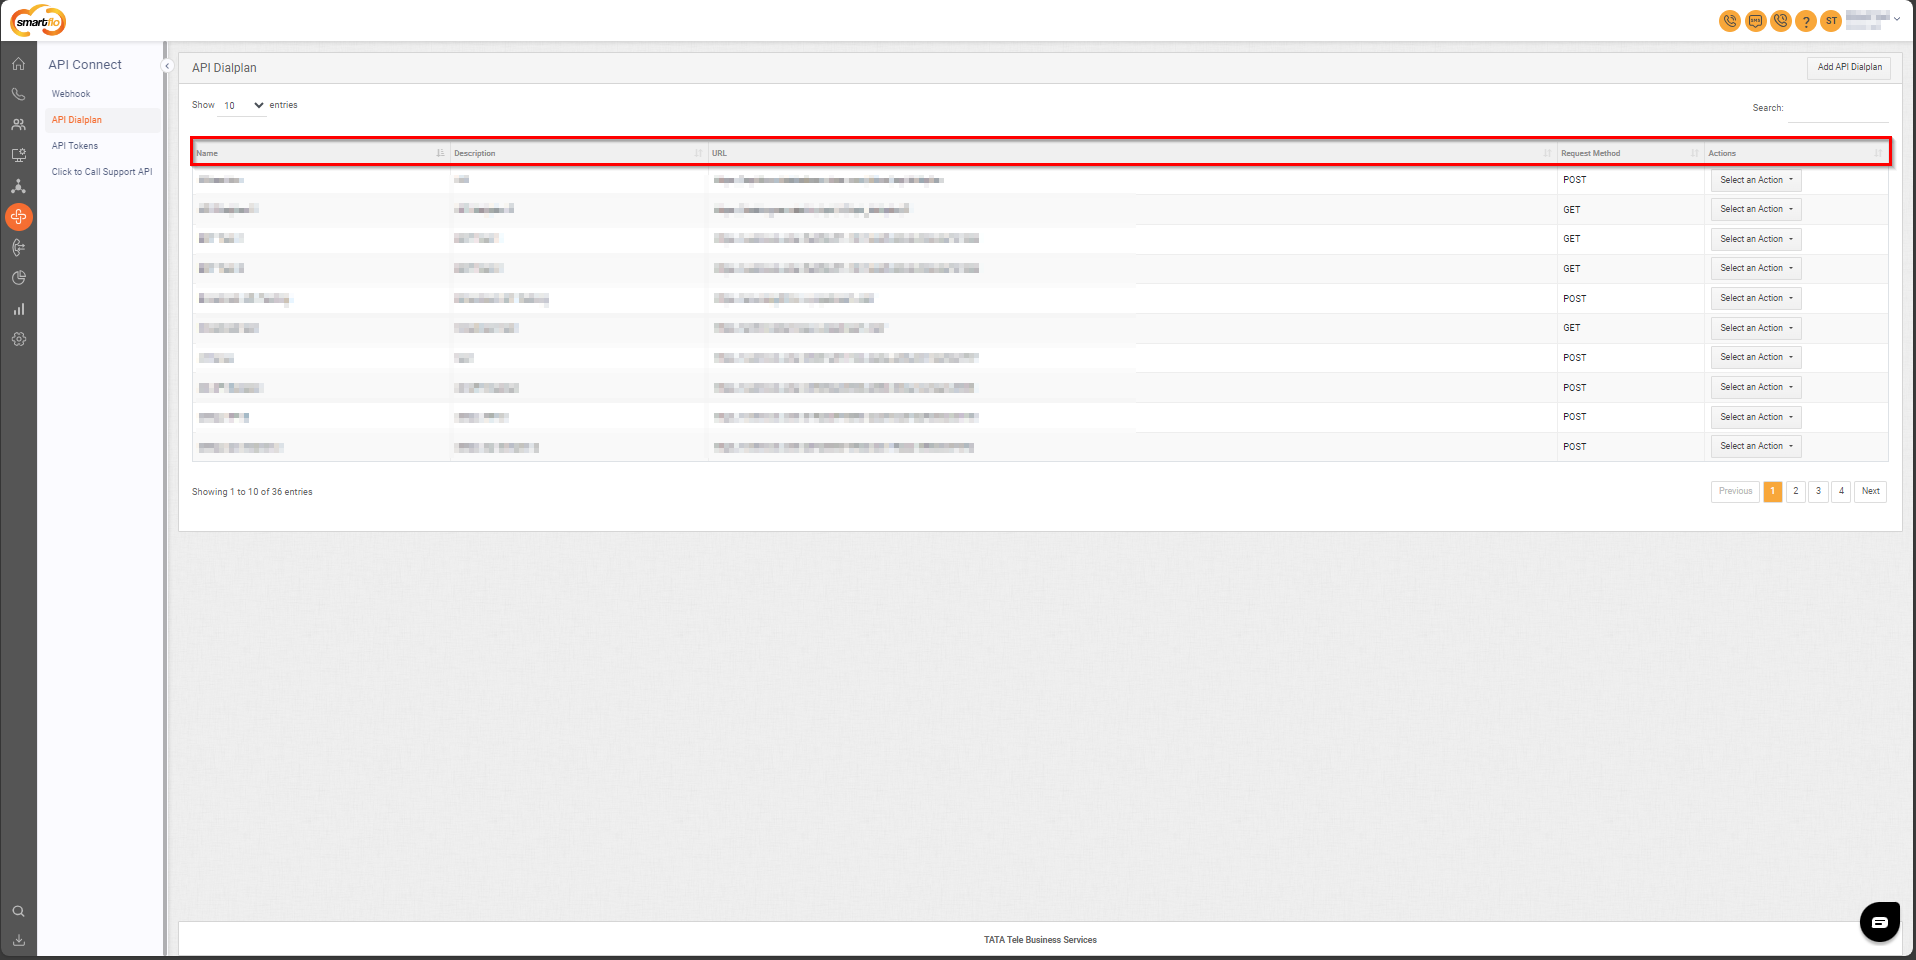
- The table displays a list of all API Dialplan with the following information:
| Field | Description |
|---|---|
| Name | The name of the API Dialplan for easy identification. |
| Description | A brief explanation of the API Dialplan's purpose or functionality. |
| URL | The endpoint where API requests will be sent. |
| Request Method | The HTTP method used for the API call, such as GET or POST. |
| Action | Options to Edit or Delete the API Dialplan configuration. |
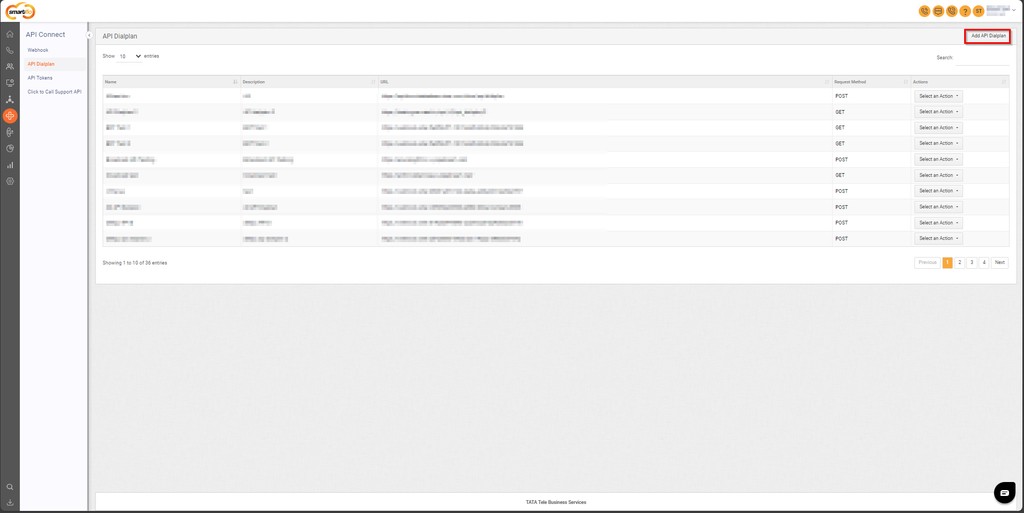
- Add API Dialplan
- To add API Dialplan, follow the below steps:
- Click on the API Connect tab on the side navigation.
- Click on API Dialplan.
- A list of all the API Dialplan appears along with the relevant details.
- Click on Add API Dialplan.
- The following screen will appear, prompting you to complete the necessary fields as shown in the screenshot below.
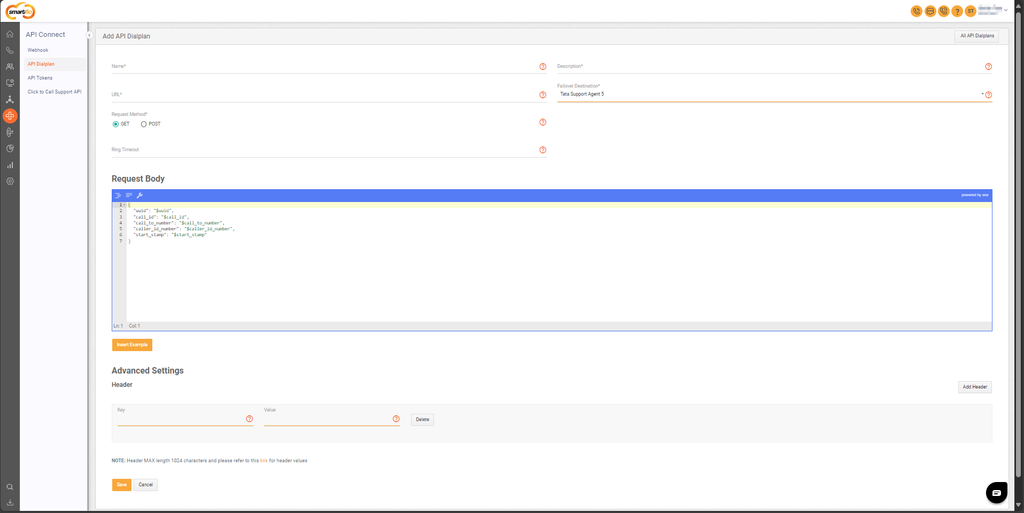
- Here is a table explaining the fields from the Add API Dialplan interface based on the screenshot:
| Field | Description |
|---|---|
| Name | Specify a unique name for the API Dialplan for easy identification. |
| Description | Provide a brief description of the API Dialplan’s purpose or functionality. |
| URL | Enter the endpoint where the API requests will be sent for processing. |
| Failover Destination | Define the fallback destination (e.g., an agent or queue) if the primary action fails. |
| Request Method | Select the HTTP method for the request. Options include GET or POST. |
| Ring Timeout | Set the duration of time (Seconds) for the call to ring on the agent. |
| Request Body | Define the JSON payload that will be sent with the API request. Example fields include:
|
| Insert Example | Button to insert a predefined example structure into the request body for reference. |
| Advanced Settings | Section to configure additional HTTP headers for the API request. |
| Header (Key/Value) | Add custom header key-value pairs (e.g., authentication tokens) with a max length of 1024 characters. |
-
Click Save.
-
Assign API Dialplan to a DID
i. Go to Services - My Numbers to assign API Dialplan to a DID.
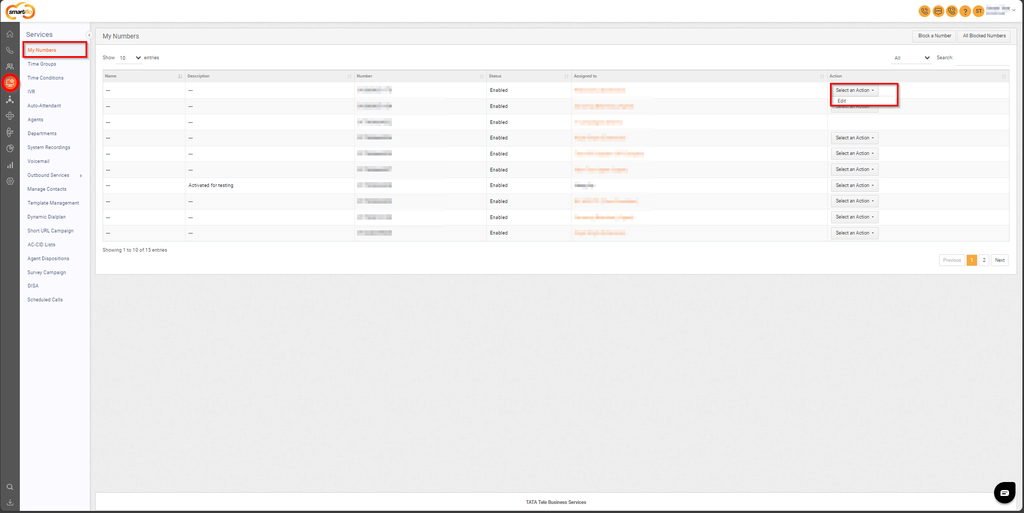
ii. Click Select an Action and then click Edit.
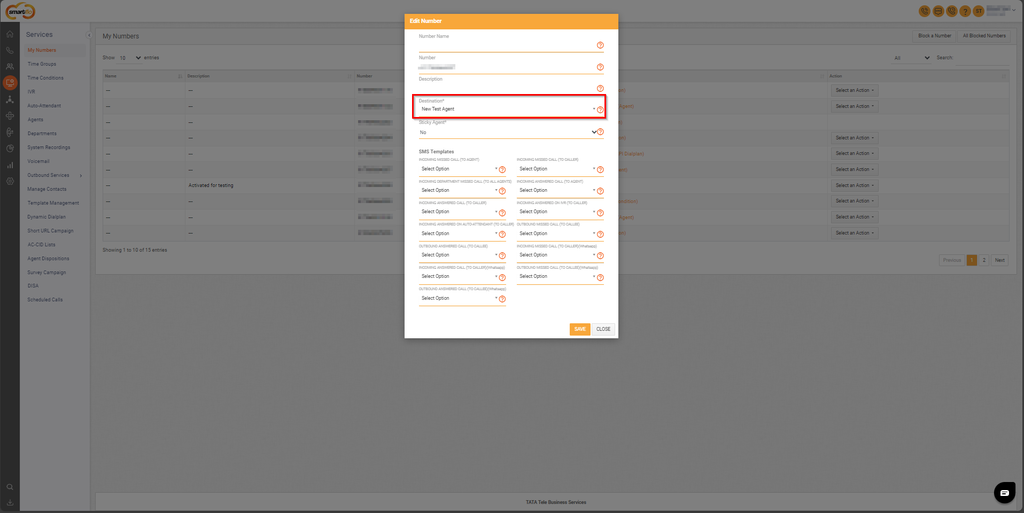
iii. Select Destination as your API Dialplan and click SAVE.
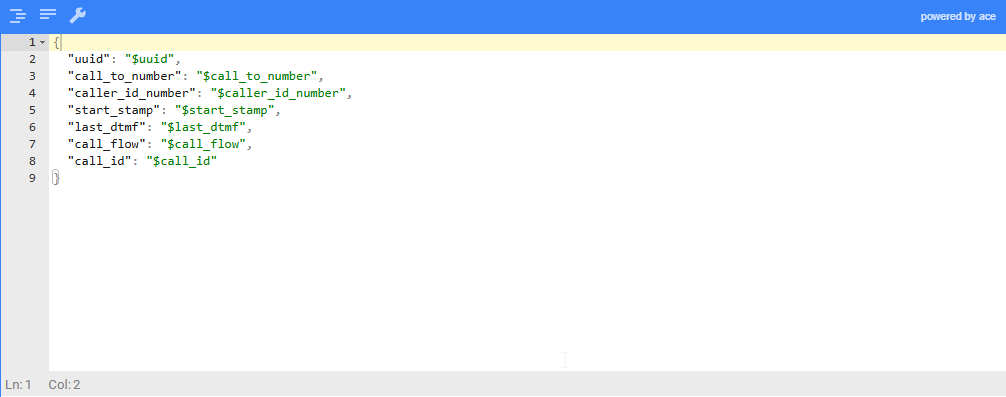
Request Variables
- The below data is retrieved from the customer’s API that was specified during API dialplan configuration.
| Variable Name | Description | Data Type |
|---|---|---|
| $uuid | The unique ID of the call. For example, 7611. | String |
| $call_to_number | The dialed number. For example, +91-XXXXXXXXXX. | String |
| $caller_id_number | The caller number. For example, +91-XXXXXXXXXX. | String |
| $start_stamp | The start time of the call. For example, YYYY-mm-dd HH: mm: ss. | String |
| $last_dtmf | DTMF entered by the caller | String |
| $call_flow | The journey of the call | String |
| $call_id | The call ID available in call detail records. For example, 1642XXXX.XXX012. | String |
Request Body
Response Variables
- The response variables can be either a recording or a transfer along with the API Dialplan.
| Variable Name | Description | Data Type |
|---|---|---|
| recording | Required, if play recording is the action to be performed. | Object |
| transfer | Required, if call transfer is the action to be performed. | Object |
| api_dialplan | Required, if another API Dialplan is to be executed as an action. | Object |
Note:Kindly rasie a Service Request (SR) to Tata Cloud Telephony support team to enable API Dialplan on portal for your account.
Recording
- A System Recording can be used as a pre-recorded message in Auto-Attendant and IVR. We integrate custom recordings provided by the client and play them based on the DTMF response received for specific numbers.
- Let's understand these response variables:
| Variable Name | Description | Data Type | Field Type |
|---|---|---|---|
| type | The source of the recording. | String | Required |
| data | The data required for recording to be played (example: unique ID of recording, URL of recording). | String | Required |
| dtmf | The DTMF if needed over recording. | Object | Optional |
- Recording can be one of the following fields:
| Variable Name | Description | Data Type |
|---|---|---|
| system | Required, if the source of recording is the recording present on TATA's web portal. | String |
| url | Required, if the source of recording is an external URL. Format - MP3 Channels - MONO Sample Rate - 8000 Hz Bitrate- 48 kbps CBR (or lower) | String |
- DTMF object can have the following three properties:
| Variable Name | Description | Data Type | Field Type |
|---|---|---|---|
| timeout | The digit timeout while entering DTMF, is to be provided in milliseconds. | Integer | Optional |
| maxlength | The maximum length of input to be captured. | Integer | Optional |
| retry | The number of retries to take input over recording in case of timeout. | Integer | Optional |
Note:If these keys are not provided, by default, 5000, 10 and 0 will be used for timeout, maxLength and retry, respectively. Maximum number of allowed retries is 5.
NoteThe response from the URL should be in a single line. Below is an example of the expected response format:
[available in the standard version or user interface. It operates on a request-response model, processing use]
[{
	"recording": {
		"type": "system",
		"data": 1234,
		"dtmf": {
			"timeout": 6000,
			"maxLength": 4,
			"retry": 2
		}
	}
}]- Refer to the below table for available transfer types and information on their corresponding data fields:
| Variable Name | Description | Data Type |
|---|---|---|
| Agent number | Required if the call is to be transferred to one or more agent's mobile number. | Array of 10-digit mobile number(s) |
| Agent ID | Required if the call is to be transferred to one or more agents using agent ID. | Array of agent ID(s) |
| Agent Extension | Required if the call is to be transferred to the agent extensions. | Array of agent extension ID(s) |
| IVR | Required if the call is to be transferred to an IVR. | String |
| Auto Attendant | Required if the call is to be transferred to an auto-attendant. | String |
| Department | Required if the call is to be transferred to a department. | String |
Note:For number and agent types, in the above table, multiple values are supported, whereas for the rest only a single value will be accepted. The response schema displayed below mentions the value for number and agent types.
Transfer
- Call transfer based on call queue strategies allows us to transfer calls based on client requirements. It is used along with recordings and API Dialplan to provide customized call transfers using the client's API.
- This object has the following properties:
| Variable Name | Description | Data Type | Field Type |
|---|---|---|---|
| type | The destination for transfer. | String | Required |
| data | The number or ID for the destination depends on the transfer type. | Array/String | Required |
| ring_type | The ring strategy in case of multiple numbers/agents in number/agent/intercom transfer types can have one of the following values:
| String | Optional |
| moh | Plays music or recording when a call is placed on hold. | String | Optional |
| skip_active | By default false True or false | Boolean | Optional |
NoteIn case of any kind of failure in receiving an appropriate response from API, the action selected in the Failover destination field will be executed.
New Parameter Added:This feature allows customers to dynamically disable call recording for specific calls using the disable_call_recording parameter in the transfer object.
> 📘 "disable_call_recording": true // To Disable recording for a specific call

> 📘 "disable_call_recording": false // To Enable recording for a specific call
Call transfer based on Agent number:
- Enter the 10-digit phone number to transfer the call to the specific agent. The below example code shows transfer based on Number.
[{
	"transfer": {
		"type": "number",
		"data": ["981XXXXXXX"],
    "ring_type":"order_by",
    "skip_active":true
	}
}]
Call transfer based on Agent ID
- Enter the Agent ID to transfer the call to the specific agent. The below example code shows transfer based on ID.
[{
	"transfer": {
		"type": "agent",
		"data": ["05000001"],
    "ring_type":"order_by",
    "skip_active":true
	}
}]
Call transfer based on Agent Extensions
- Enter the Agent Extension to transfer the call to the specific agent.The below example code shows transfer based on Agent Extension.
[{
	"transfer": {
		"type": "agent",
		"data": ["06047530001"],
    "ring_type":"order_by",
    "skip_active":true
	}
}]
Call transfer using IVR
- Enter the IVR id to transfer the call to the specific IVR. The below example code shows transfer based on IVR.
[{
	"transfer": {
		"type": "ivr",
		"data": ["22590"]
	}
}]
Call transfer using Auto Attendant
- Enter the Auto Attendant ID to transfer the call to the specific Auto Attendant. The below example code shows a transfer based on Auto Attendant.
[{
	"transfer": {
		"type": "auto_attendant",
		"data": ["22590"],
	}
}]
The Call transfer to the agent in a Department can be done in two ways:
- Number:
- Agent ID:
Call transfer to Department with agents created on panel.
- Enter the Agent ID to transfer the call to the specific Department. The below example code shows a transfer in the Department using Agent ID.
[{
	"transfer": {
		"type": "agent",
		"data": ["05000001", "05000002", "05000003"],
		"ring_type": "order_by",
    "skip_active":true,
		"moh": "1235"
	}
}]
Call transfer to Department with agents not created on panel.
- Enter the Agent number to transfer the call to the Department. The below example code shows a transfer in the Department using the agent number.
[{
	"transfer": {
		"type": "number",
		"data": ["9988776655", "9988776654", "9988776653"],
		"ring_type": "order_by",
    "skip_active":true,
		"moh": "1235"
	}
}]
Music on Hold in TransferThe 'moh' key expects ID of the system recording to be used as MOH during transfer. It is required that this recording is marked as MOH.
A non MOH marked recording will be treated as an invalid input.
Custom Parameters Support
- The API Dialplan supports a maximum of 3 custom parameters. These parameters can be passed along with the transfer destination and will be propagated to the webhook payload generated for the call event.
Example Request:
[
  {
    "transfer": {
      "type": "number",
      "data": ["981XXXXXXX"],
      "ring_type": "order_by",
      "skip_active": true,
      "custom_parameter_1": "value1",
      "custom_parameter_2": "value2",
      "custom_parameter_3": "value3"
    }
  }
]
Webhook Response:
{
  "uuid": "$uuid",
  "call_to_number": "$call_to_number",
  "caller_id_number": "$caller_id_number",
  "custom_parameter_1": "$Customparameter1",
  "custom_parameter_2": "$Customparameter2",
  "custom_parameter_3": "$Customparameter3"
}
Important:
- Webhook should contain the $custom_parameters in the JSON to receive the response
- A maximum of 3 custom parameters is supported in API Dialplan. Any additional custom parameters beyond this limit will not be processed and will not be included in the webhook payload.
Nested API Dialplan
- The existing API Dialplan needs to be executed to perform the necessary actions. You can add multiple API Dialplan to perform various actions.
| Variable Name | Description | Data Type |
|---|---|---|
| api_dialplan | Represents the configuration and structure of the API Dialplan used to define call flows and integration with external systems. | |
| data | The ID of API Dialplan.
| String |
- In return, we expect a response in the below format:
[{
	"api_dialplan": {
		"data": "6140fff5dba07c19f853ac81"
	}
}]STEP 1 - 1st API Dialplan:
Request:
{
"uuid": "$uuid",
"call_id": "$call_id",
"call_to_number": "$call_to_number",
"caller_id_number": "$caller_id_number",
"start_stamp": "$start_stamp"
}
Expected Response: [
[{
"recording": {
"type": "system",
"data": 156848,
"dtmf":{
"timeout": 6000,
"maxLength": 4,
"retry": 2
}
}
}],
[{
"api_dialplan": {"data": "6733074ecbb570864f06bc14"
}
}]
]
STEP 2 - 2nd API Dialplan:
Request:
{
"uuid": "$uuid",
"call_id": "$call_id",
"call_to_number": "$call_to_number",
"caller_id_number": "$caller_id_number",
"start_stamp": "$start_stamp",
"last_dtmf": "$last_dtmf"
}
Expected Response: [
[{
"recording": {
"type": "system",
"data": 156849,
"dtmf":{
"timeout": 6000,
"maxLength": 4,
"retry": 2
}
}
}],
[{
"api_dialplan": {"data": "6733074ecbb570864f06bc14"
}
}]
]
STEP 3 - 3rd API Dialplan:
Request:
{
"uuid": "$uuid",
"call_id": "$call_id",
"call_to_number": "$call_to_number",
"caller_id_number": "$caller_id_number",
"start_stamp": "$start_stamp",
"last_dtmf": "$last_dtmf"
}
Expected Response: [
[{
"recording": {
"type": "system",
"data": 156850,
"dtmf":{
"timeout": 6000,
"maxLength": 4,
"retry": 2
}
}
}],
[{
"api_dialplan": {"data": "6733074ecbb570864f06bc14"
}
}]
]